When you hear bothersome droplets from your kitchen tap or can’t quite figure out why your bathroom tap won’t turn off, a dripping tap can quickly become a major annoyance.
Those seemingly harmless water droplets can cost you a big chunk of your wallet and damage your property, so make sure you act in time to fix your leaking tap.
Check out our easy-to-follow guide on how to fix a dripping tap and help to keep your home safe from water damage.
- Types of taps and tools you need
- Tools to fix dripping tap
- Tips before you begin
- How to repair a dripping tap
Types of taps and tools you need
Taps leak for different reasons, depending on the type of tap you have. Some taps use washers, whilst others use ceramic discs.
- Traditional taps, also known as compression valves, use washers. A worn washer often causes leaks. So, it's likely the washer needs replacing.
- Monobloc lever taps are single unit taps that are usually ceramic. A broken ceramic cartridge can cause dripping and will need replacing.
Tools to fix dripping tap
Before you start, make sure you've got all the necessary tools to fix your dripping tap:
- An adjustable spanner
- Slot and cross-head screwdrivers
- Scissors
- Tap cartridge replacement
- Various washers and O-rings
Tips before begin
- Turn off your water supply
- Thoroughly run the taps to drain any water
- Be careful not to over-tighten parts when putting everything back
How to repair a dripping tap
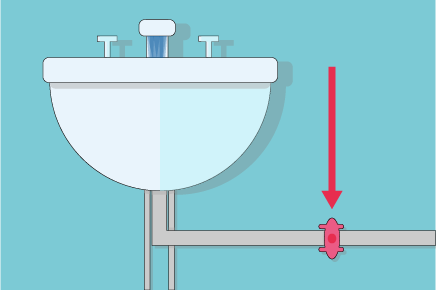
Step 1: Turn off the water
First you need to turn off the water using an isolation valve or stopcock, depending on which one you have. Check the pipes underneath your sink if you're not sure where it is.
Step 2: Find and remove the screws
Find the screw holding the visible parts of your tap together. It's usually hidden under the hot and cold caps. You should be able to unscrew by hand, but if not, you can use a slot-head screwdriver to unscrew the taps.
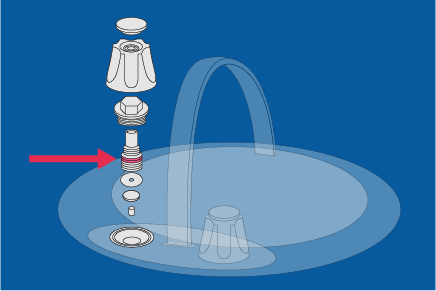
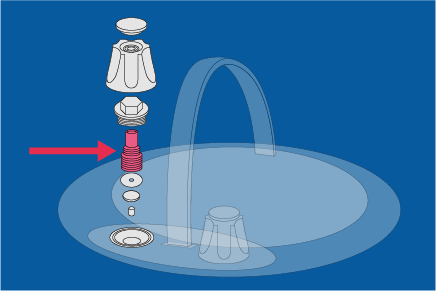
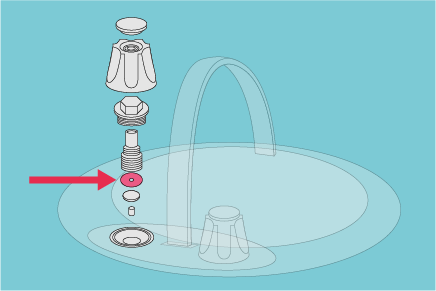
Step 3: Take apart the tap
Unscrew the tap head. If it has a metal cover, you'll need to take it off too. Keep the parts in order so you can more easily put them back together again later.
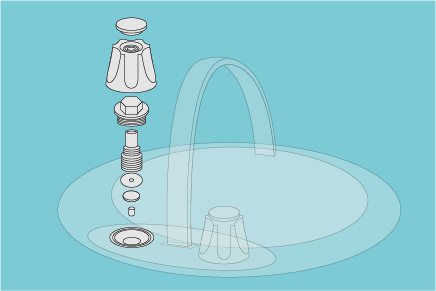
Choose either steps 4, 5 and 6 based on the type of tap you have.
Step 4: Change the ceramic disc (for ceramic taps)
The valve should now be visible. With the spanner, turn the valve by gripping it and rotating it until it seems loose enough to remove. Now put in your new tap cartridge replacement, tighten it, and reassemble your tap in the correct order.
Step 5: Change the rubber washer (for old style taps)
To change a washer, use your spanner and turn the valve until it’s loose enough to be removed. Unscrew or slide the rubber washer off and replace it with a brand new one. Put everything back together in the right order.
Step 6: Check the O-ring (if it still leaks)
If your tap still leaks, check the O-ring for signs of wear and tear. The O-ring is a larger version of the washer found at the bottom of your tap spout.
Access the O-ring by unscrewing the grub screw at the bottom of the spout and lifting it. Once you spot the O-ring at the base, loosen it and slide it off. Or you can use scissors to cut it off if needed. Then insert the replacement O-rings, place the spout back where it was and tighten the screw.
We hope this guide was useful in learning how to fix your leaking tap. If you want to keep your home protected against damage, take a look at our home insurance policy and get a quote today.